
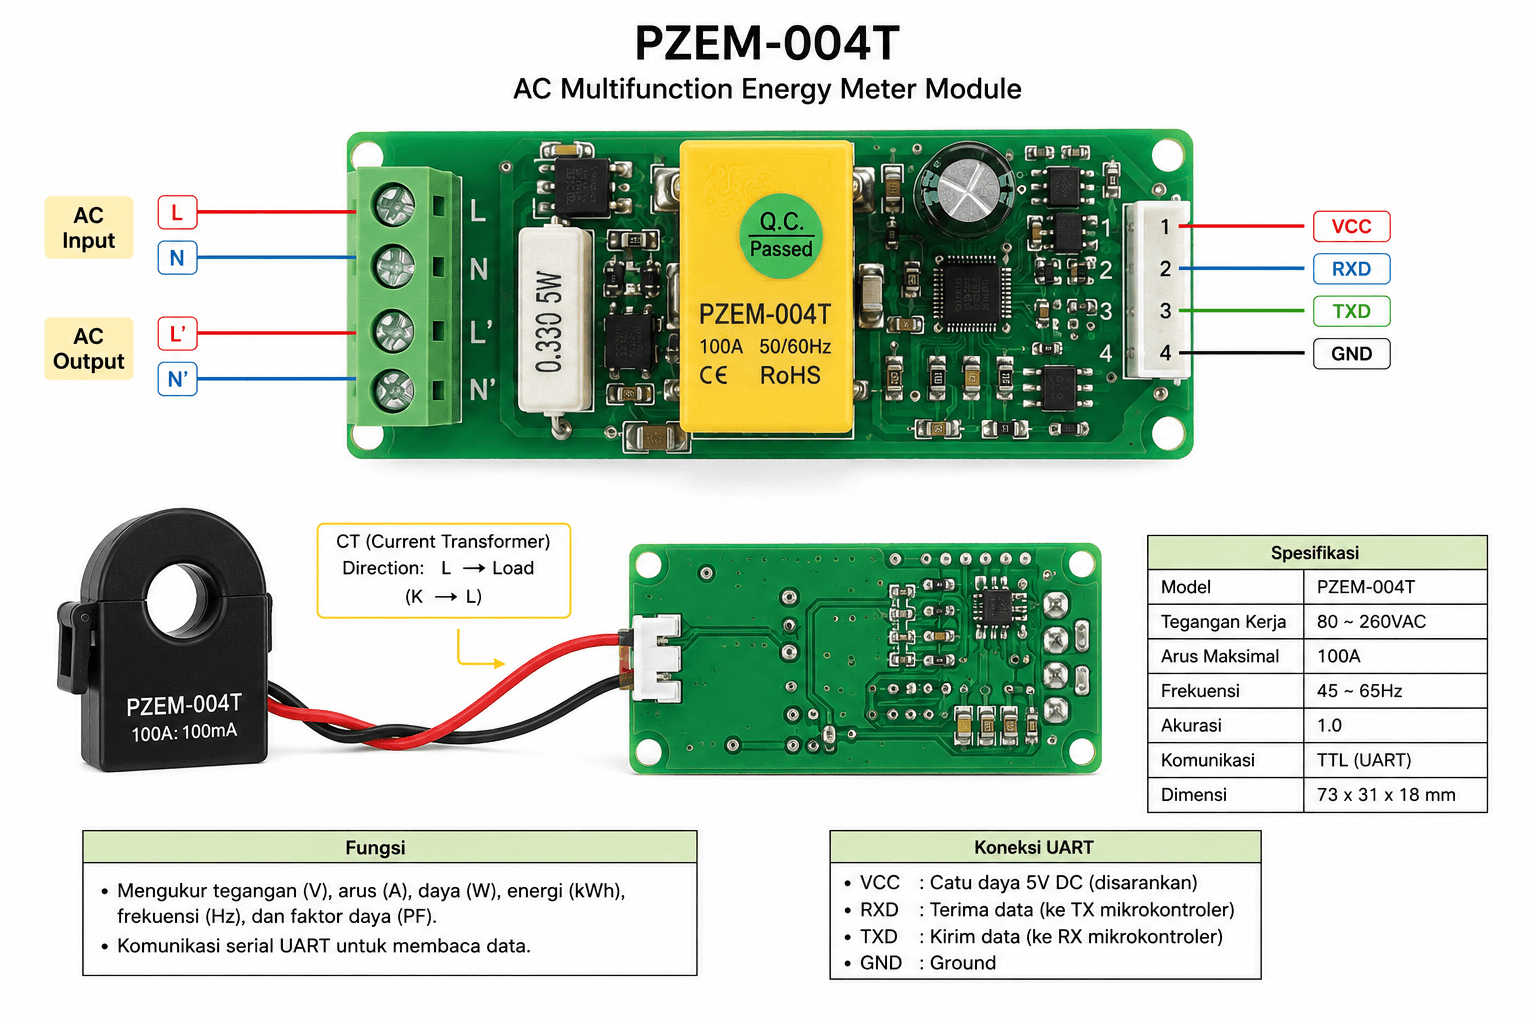
PZEM-004T Energy Sensor
Measure voltage, current, power, energy, frequency, and power factor with high accuracy
Safety Warning
PZEM-004T works with high voltage (AC 80-260V). Always disconnect power before wiring. Never touch exposed terminals when connected to mains power. Use proper insulation and enclosure for production deployment.
Specifications
Pin Configuration
PZEM-004T v3.0 has 4 connection pins for communication:
| Pin | Name | Function | ESP32 Connection |
|---|---|---|---|
| 1 | 5V | Power supply (5V DC) | 5V or VIN pin |
| 2 | RX | Receive data (TTL 5V) | GPIO 17 (TX2) |
| 3 | TX | Transmit data (TTL 5V) | GPIO 16 (RX2) |
| 4 | GND | Ground | GND pin |
Logic Level Note
PZEM uses 5V TTL logic while ESP32 uses 3.3V. However, ESP32 pins are 5V tolerant for input, so direct connection usually works. For production, consider using a logic level converter for better reliability.
High Voltage Wiring
PZEM has 4 screw terminals for AC power measurement:
| Terminal | Label | Connection |
|---|---|---|
| 1 | L in | Live/Phase input from mains |
| 2 | N in | Neutral input from mains |
| 3 | L out | Live/Phase output to load |
| 4 | N out | Neutral output to load |
Wiring Sequence
- Disconnect all AC power sources
- Connect L in and N in to mains power
- Connect L out and N out to your load (appliance)
- Current flows through L in → L out (measured by internal CT)
- Double-check all connections before powering on
Arduino Library Installation
1. Install PZEM004Tv30 Library
Open Arduino IDE → Sketch → Include Library → Manage Libraries → Search "PZEM004Tv30"
Library Managercpp
// Or install via Library Manager // Search: PZEM-004T-v30 // Author: Jakub Mandula2. Include in Your Code
include_pzem.inocpp
#include <PZEM004Tv30.h>

// Initialize PZEM on Serial2 (GPIO 16/17)
PZEM004Tv30 pzem(Serial2, 16, 17); // RX, TX
Basic Reading Code
pzem_basic_read.inocpp
#include <PZEM004Tv30.h>

// Initialize PZEM on Serial2
// RX (GPIO 16), TX (GPIO 17)
PZEM004Tv30 pzem(Serial2, 16, 17);

void setup() {
  Serial.begin(115200);
  Serial.println("PZEM-004T Test");
  delay(1000);
}

void loop() {
  // Read voltage
  float voltage = pzem.voltage();
  if (!isnan(voltage)) {
    Serial.print("Voltage: ");
    Serial.print(voltage);
    Serial.println(" V");
  } else {
    Serial.println("Error reading voltage");
  }

  // Read current
  float current = pzem.current();
  if (!isnan(current)) {
    Serial.print("Current: ");
    Serial.print(current);
    Serial.println(" A");
  }

  // Read power
  float power = pzem.power();
  if (!isnan(power)) {
    Serial.print("Power: ");
    Serial.print(power);
    Serial.println(" W");
  }

  // Read energy
  float energy = pzem.energy();
  if (!isnan(energy)) {
    Serial.print("Energy: ");
    Serial.print(energy, 3);
    Serial.println(" kWh");
  }

  // Read frequency
  float frequency = pzem.frequency();
  if (!isnan(frequency)) {
    Serial.print("Frequency: ");
    Serial.print(frequency, 1);
    Serial.println(" Hz");
  }

  // Read power factor
  float pf = pzem.pf();
  if (!isnan(pf)) {
    Serial.print("Power Factor: ");
    Serial.println(pf);
  }

  Serial.println("----------------------------");
  delay(2000);
}
Complete Integration with WiFi
gridova_pzem_complete.inocpp
#include <WiFi.h>
#include <HTTPClient.h>
#include <ArduinoJson.h>
#include <PZEM004Tv30.h>

// WiFi credentials
const char* ssid = "YOUR_WIFI_SSID";
const char* password = "YOUR_WIFI_PASSWORD";

// API endpoint
const char* serverUrl = "https://api.gridova.com/sensor-data";
const char* deviceId = "ROOM_001";

// Initialize PZEM
PZEM004Tv30 pzem(Serial2, 16, 17);

void setup() {
  Serial.begin(115200);

  // Connect to WiFi
  WiFi.begin(ssid, password);
  while (WiFi.status() != WL_CONNECTED) {
    delay(500);
    Serial.print(".");
  }
  Serial.println("\nConnected to WiFi");
}

void loop() {
  // Read all sensor values
  float voltage = pzem.voltage();
  float current = pzem.current();
  float power = pzem.power();
  float energy = pzem.energy();
  float frequency = pzem.frequency();
  float pf = pzem.pf();

  // Check if readings are valid
  if (isnan(voltage)) {
    Serial.println("Error reading PZEM sensor");
    delay(5000);
    return;
  }

  // Create JSON payload
  StaticJsonDocument<512> doc;
  doc["device_id"] = deviceId;
  doc["timestamp"] = millis();

  JsonObject data = doc.createNestedObject("data");
  data["voltage"] = voltage;
  data["current"] = current;
  data["power"] = power;
  data["energy"] = energy;
  data["frequency"] = frequency;
  data["power_factor"] = pf;

  String jsonString;
  serializeJson(doc, jsonString);

  // Send to server
  if (WiFi.status() == WL_CONNECTED) {
    HTTPClient http;
    http.begin(serverUrl);
    http.addHeader("Content-Type", "application/json");

    int httpCode = http.POST(jsonString);

    if (httpCode > 0) {
      Serial.printf("Server response: %d\n", httpCode);
    } else {
      Serial.printf("Error: %s\n", http.errorToString(httpCode).c_str());
    }

    http.end();
  }

  // Display on Serial Monitor
  Serial.println("===== PZEM Readings =====");
  Serial.printf("Voltage: %.2f V\n", voltage);
  Serial.printf("Current: %.3f A\n", current);
  Serial.printf("Power: %.2f W\n", power);
  Serial.printf("Energy: %.3f kWh\n", energy);
  Serial.printf("Frequency: %.1f Hz\n", frequency);
  Serial.printf("Power Factor: %.2f\n", pf);
  Serial.println("========================\n");

  delay(5000); // Send every 5 seconds
}
Energy Reset Function
Reset accumulated energy counter (useful for monthly billing):
reset_energy.inocpp
void resetEnergy() {
  Serial.println("Resetting energy counter...");

  if (pzem.resetEnergy()) {
    Serial.println("Energy counter reset successfully");
  } else {
    Serial.println("Failed to reset energy counter");
  }
}

// Call this function when needed
// For example, at the start of each month
void loop() {
  // Your normal code here

  // Check if it's the 1st day of month
  // Reset energy counter
  // resetEnergy();
}
Calibration (Optional)
PZEM-004T v3.0 is pre-calibrated from factory. However, if you need to adjust:
Troubleshooting
Safety Guidelines
Electrical Safety
- Always disconnect AC power before making any connections
- Use proper wire gauge rated for your load current
- Secure all terminals - loose connections can cause arcing
- Install in proper enclosure - never leave terminals exposed
- Add circuit breaker/fuse for overcurrent protection
- Follow local electrical codes and regulations
- Have installations inspected by certified electrician
- Never work on live circuits unless absolutely necessary and qualified